Restorative Yoga – Supported Back Bend
Benefits:
Also know as the “Anti-Slouch Pose”, this pose helps to relieve stress by opening the chest and shoulders while gently stretching the lower and middle back.
Props:
1 Blanket
Technique:
1) Fold the blanket in thirds and stack them lengthwise on your mat.
2) Sit in front of the blanket, and begin to lie back coming onto your elbows and gradually lowering your torso and neck onto the blanket.
3) Your chin and forehead should be inline, relaxed and comfortable.
4) Allow your arms to come out to the side in cactus pose, bent at the elbow and relaxed to open the chest fully.

Variations:
If your chin pops up and the neck is over-stretched, add a small pillow or towel roll under your head to maximize comfort. If more stretch is desired to the low back add an additional blanket to increase the height and extension to the low back.
Breath:
Place the eye bag over your eyes, and breathe deeply. Hold the pose for 60 seconds, adjusting the height of the blankets or sliding up or down the blankets to find a more comfortable position as desired.
Tip: Try Simple Supported Back Bend after a long day at work to refresh, restore, and renew!
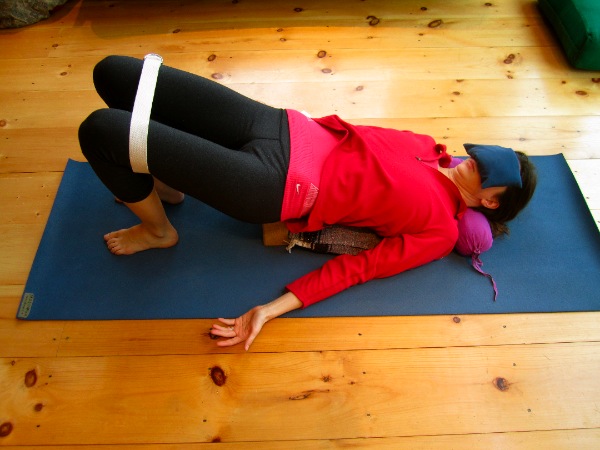
Restorative Yoga-Bridge Pose
Benefits:
This is an excellent pose to release stretch the iliopsoas (hip flexors), quadriceps (fronts of thighs), as well as open spine and chest. Bridge pose helps to build power, endurance and stamina. In this pose, both groundedness and expansion are felt that with regular practice leads to a sattvic (balanced) state of being.
Props:
Block, Rolled Blankets, Strap
Technique:
1) Lie on your back with your arms at your side. Use a strap around the mid thighs to keep the legs parallel without effort once in position.
2) Bend your knees and place the feet flat on the ground as close to the buttocks as possible. Allow the feet to be slightly pigeon-toed.
2) Take a deep breath in and on the exhalation push the feet into the ground, flatten the low back against the ground, and slowly curl the spine upward from the tailbone and one vertebrae at a time peel your spine upward off the ground until only the upper torso remains in contact with the mat.

3) Place the block (or bolster) under your sacrum. Try the block on its middle setting first and then highest setting as tolerated.
4) After the block is positioned, carefully roll your shoulders underneath you to open up the chest. Interlace the fingers, extending the arms towards the heels, keeping the arms and hands on the floor. If this gets in the way of the block keep the arms rolled under but do not interlace the fingers.
5) The chest should open allowing the sternum to lift towards the chin.
6) Draw deep breaths into the belly and observe the sensations building in the body. The feet pressing into the earth create a grounding feeling as the chest expanding and spine extending arouse a reflective quality of peace.
7) Maintain this position for 2 minutes before releasing the shoulders, removing the block, and gently descending onto the mat.
Variations:
* For more support under the middle/upper back place a bolster perpendicular to the mat underneath the middle back. Position the block on its highest position under the sacrum.

Breath:
Once in the pose inhale as you ground your feet into the earth and on the exhale imagine the chest expanding skyward.
Contraindications:
As with all yoga poses listen to your body and steadily move towards the final posture without forcing into an external mold. Avoid this pose if you have neck injury.
Paschimottanasana, Supported Forward Fold
Benefits:
This restorative yoga pose is helpful for lengthening hamstrings, calves, and spine. When done properly, it can also alleviate anxiety, fatigue, headache as well as improve digestion and well-being.
Props:
Rolled blanket or Bolster, pillow, yoga block.
Technique:
1) Begin by placing the rolled blanket or bolster under your knees with your knees comfortably bent.
2) Position the pillow on your thighs towards the abdomen.

3) On in inhale reach your hands upward and exhaling slowly start to fold over your legs onto the pillow. The stretch should be comfortable. If there is any discomfort increase the height of the support beneath your knees and/or place the yoga block on the pillow to support your head.
4) Close your eyes and breathe deeply into the belly softening further into the pose with each exhalation as you release your thoughts and come into the moment.
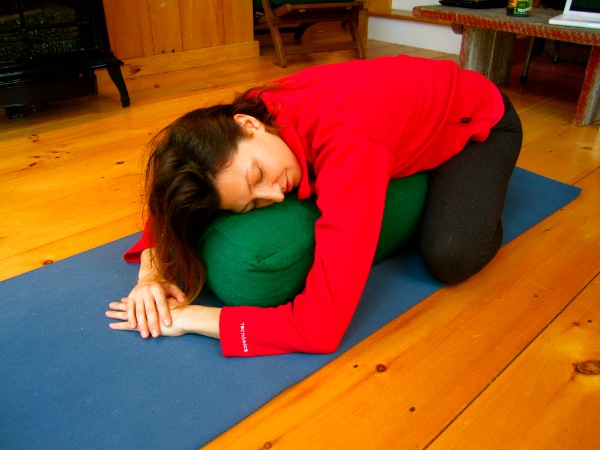
Salamba Balasana, (Supported Child’s Pose)
Benefits:
This is a deeply relaxing pose that aims to quiet the mind and calm the body. It gently stretches the hips, thighs, and ankles, and helps to relieve some types of back and neck pain.
Props:
Bolster or Thick Towel Roll
Technique:
1) Come into a kneeling position on your mat with the bolster of towel roll positioned between your knees.
2) Sit onto your shins and then on an exhale slowly lay your torso down over the bolster
3) Arms can be either in front or positioned to the sides of the body.

4) The head should be turned in one direction and then switched to the opposite direction half way through the hold.
5) Hold the pose for 1-3 minutes and breath deeply as you fully relax into the pose.
6) To release from the pose gently push off the bolster with arms at either side and remain sitting for a few breathes before moving on.
Variation:
A blanket may be positioned between the calves and hips for more support. A towel roll under the ankles can reduce pressure to the ankle joint. Also, some students enjoy a sandbag placed over the hips to increase the feeling of being grounded, safe, and secure. If the back is sore, increase the height of the bolster or towel roll supporting the body.
Breath:
Draw the breath deeply into the middle and upper back as if you are inflating a balloon. Observe how the back creates a dome towards the ceiling as you infuse your lungs with rejuvenating oxygen. Allow the muscles of your face to relax and your eyes to soften.
Contraindications:
Pregnancy, diarrhea
Also known as Salamba Balasana, (Supported Child’s Pose)
Benefits:
This is a deeply relaxing pose that aims to quiet the mind and calm the body. It gently stretches the hips, thighs, and ankles, and helps to relieve some types of back and neck pain.
Props:
Bolster or Thick Towel Roll
Technique:
1) Come into a kneeling position on your mat with the bolster of towel roll positioned between your knees.
2) Sit onto your shins and then on an exhale slowly lay your torso down over the bolster
3) Arms can be either in front or positioned to the sides of the body.
4) The head should be turned in one direction and then switched to the opposite direction half way through the hold.
5) Hold the pose for 1-3 minutes and breath deeply as you fully relax into the pose.
6) To release from the pose gently push off the bolster with arms at either side and remain sitting for a few breathes before moving on.
Variation:
A blanket may be positioned between the calves and hips for more support. A towel roll under the ankles can reduce pressure to the ankle joint. Also, some students enjoy a sandbag placed over the hips to increase the feeling of being grounded, safe, and secure. If the back is sore, increase the height of the bolster or towel roll supporting the body.
Breath:
Draw the breath deeply into the middle and upper back as if you are inflating a balloon. Observe how the back creates a dome towards the ceiling as you infuse your lungs with rejuvenating oxygen. Allow the muscles of your face to relax and your eyes to soften.
Contraindications:
Pregnancy, diarrhea
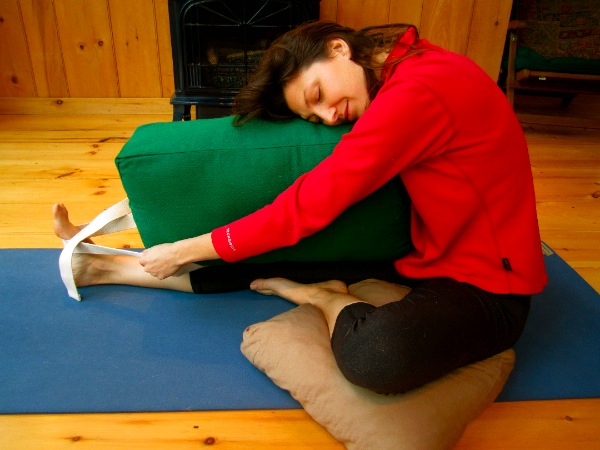
Benefits:
This pose stimulates the liver and kidneys and improves digestion. It also provides a deep stretch to the spine, shoulders, and hamstrings helping to relieve mild backache. Other benefits include reduction of anxiety, fatigue, and headache. It promotes a sense of calm and nourishing well-being.
Props:
Folded Blanket, Strap, Pillow or Bolster
Technique:
1) Sit on the folded blanket with both legs straight in front of you. Bend your right knee placing the sole of the right foot against the upper inner left thigh. Allow the right knee to rest onto the floor or support onto another folded blanket if it doesn’t reach the floor.
2) On an inhale lengthen the spine and exhaling twist the torso directing the navel towards the outstretched leg. Inhale again lifting the fingers towards the sky and then exhale descending onto the leg.
3) Use the strap hooked over the arch of the foot to gently pull yourself down over the leg with your arms bent.

4) When you feel you have lengthened your spine and feel you’ve met your edge with the hamstring stretch allow yourself to rest onto your leg if comfortable or place the pillow or bolster between your torso and leg allowing it to support you in the extended stretch. Turn your head to one side and allow the arms to drape onto the ground at your side.
5) Maintain this posture for 1-2 minutes gradually building tolerance to 3-5 minutes.
6) Switch legs and repeat steps 2-5.
Breath: Breathe deeply and allow all tension to release as you center yourself into a moment of pure relaxation.
Contraindications/Precautions:
Diarrhea, knee injury
Benefits:
This restorative yoga pose focuses on releasing tight adductors (the inner thigh muscle group including the Gracilis).
Props:
Folded Blanket, Bolster
Technique:
1) Start by sitting on the folded blanket placing the pelvis into anterior rotation and engaging a neutral spine.
2) Abduct the legs forming a wide-angle and see that the kneecaps are pointed up to the sky.

3) Position the bolster between your legs extending away from the body and on an exhale lay your torso onto the support.
4) Hold this pose for 2-3 minutes and use your arms to slowly push you back up to sitting, remove the bolster and fold one leg in at a time to come out of the pose.
Variations:
* You may wish to bend the knees slightly if tightness prevents you from relaxing onto the bolster. For added support, place rolled blankets under the knees and maintain safe alignment by pointing the kneecaps towards the sky.
Breath:
Observe the breath and body as you maintain this supported position. Allow yourself to sink further down onto the pose with each exhale releasing mental and physical resistance.
Contraindications:
With low back injury increase the height of the support and maintain neutral spine throughout the pose. Avoid over-flexing especially the low back.
Benefits:
This pose is a mild inversion and one of the most powerful restorative poses. It helps to relieve tired feet, legs and mild backache. It also helps to gently stretch the back of the legs, front torso, back of the neck, and calms the mind.
Props:
Two thick blankets or a bolster, (sandbag), (strap)
Technique:
1) With the blankets or bolster create a support for your low back and hips a few inches away from the wall. The height of the support and distance from the wall is determined by your flexibility. If you are stiff, the support will be lower and further away from the wall. The support is positioned perpendicular to the wall.
2) Curl onto your left side with your buttocks against the wall and just to the left of the support. On an exhale, use your left arm to assist and roll onto the support and sweeping your legs up onto the wall.

3) Adjust your position on the support so that your entire low back and middle back rest on the support with the shoulders and head resting on the floor.
4) Keep your legs straight and the back of your thighs against the wall.
5) Make sure that the front of your torso gently arches from the pubic bone to the top of the shoulders
6) Soften your eyes and your breath and relax your body completely.
7) Rest in this position for 5-10 minutes, up to 15 minutes.
8 ) To release the pose, bend your knees and roll to one side coming down from the support. Stay on your side for a few breaths and then slowly come up to a sitting position.
Variations:
Try sliding your legs apart into a wide “V” to stretch your inner thighs (adductor muscle group) and groins. Or bring the soles of your feet together as you bend your knees and slide the outer edges of your feet towards your pelvis. A stretch to the inner thighs can be achieved with a gentle push on the upper inner thighs. A sandbag may be placed resting on top of the feet to provide a strong grounding sensation and increase the hip joint approximation and release tension from the low back. A strap may also be added around the thighs to hold the legs close allowing the leg muscles to relax without effort.
Breath:
Place an eyebag on your eyes, and begin to draw long slow breaths into the belly relaxing any tension in the facial muscles.
Contraindications:
For students with neck, back problems, or high blood pressure use guidance from an experienced teacher. This pose should be avoided if you have any serious eye problems, such as glaucoma or detached retina. Also, if your feet start to tingle in this pose, bend your knees, touch your feet together, and slide them down the wall towards the support.
Benefits:
This is a simple, straightforward pose that is quick and easy to do yet offers great restorative benefits. Helpful for a midday break from work or after extended time on your feet. This pose gently relaxes the mind and body and refreshes tired legs and back.
Props:
Chair or Couch, Eye Pillow, and Strap
Technique:
1) Begin by sitting in front of the chair and as you lie down to your side, swing your legs up onto the chair. Continue to roll onto your back so that your toes face the ceiling, calves supported by the chair, and your torso is at a right angle with the chair. You may prefer to have a pillow under your calves and an eye pillow for deeper relaxation. If you choose to use a strap secure it loosely around your upper thighs and once in position tighten it to eliminate any work the legs must do to keep steady.

2) Once comfortably positioned soften the belly and release any tension held in any of your muscles.
3) Enjoy 5 minutes of Diaphragmatic Breathing.
4) Gently roll to the side bringing the legs down from the chair and then slowly pushing up to a sitting position.
Benefits:
Excellent pose to stretch shoulders and spine. Opens chest and allows for deeply relaxing breaths.
Props:
Blanket, Pillow, Bolster
Technique:
1) Begin on all fours in Table Top position. Adjust the shoulders directly above the wrists and the hips just above the knees. Place a pillow or bolster over both calves up against the flexed knee joints.
2) Walk the hands out in front of you keeping the arms engaged and hinge the hips backwards resting your thighs onto the support.

3) Allow the head and neck to release forward onto a blanket.
4) Send the breath through the low back allowing the shoulders and spine to open.
5) Maintain this position for 1-3 minutes building to 3-5 minutes with regular practice.
Contraindications:
Be cautious with shoulder injury and perform only with the guidance of a trained yoga instructor.
A Variation of Supported Puppy Pose:

Benefits:
This pose is especially beneficial at the end of a practice to restore and rebalance the nervous system. The internal organs benefit as well as blood
Props:
2 Bolsters or Large Pillows
Technique:
1) Begin by lying on your back with your knees bent. Place a bolster or pillow to either side of you.
2) Roll to one side and allow the entire length of your spine be supported from the bolster behind you as you ¼ turn back onto the support.
3) Hug the other bolster placing it between your knees and drawing it close the chest.
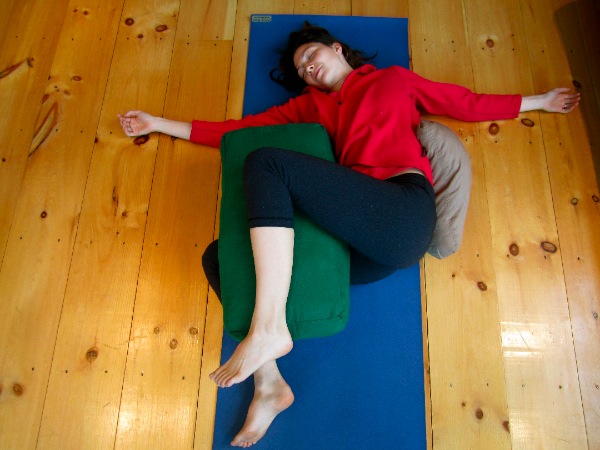
Benefits:
The pose is a gentle supported twist that relaxes and nourishes the nervous system. It helps to reduce anxiety and promote well-being.
Props:
3 Pillows
Technique:
1) Begin in a side-lying position with the first pillow behind your back running parallel with the spine.
2) Place the second pillow between the legs.
3) Gently roll backward onto the first pillow and allow your arms to open up to the sides, palms facing upwards or as comfortable.

4) Allow the head and neck to rotate with the lower spine in the direction of the first pillow, gaze is soft or eyes may be closed (treat yourself to an eye pillow for deeper relxation).
5) Release any muscles that are tense including any facial muscles, tongue, eyes that might hold be holding tension.
6) Relax in this position for 5-15 minutes allowing for equal time on the opposite side.
Variations:
* Depending on your neck, you may want to place a thin pillow or towel roll under your head and neck for comfort. Avoid thick pillows under the neck as they tend to overly flex the spine out of alignment.
Breath:
Breathe into the twist imagining that you are rinsing the spine free of toxins and allowing the body to heal and restore with every breath you take.
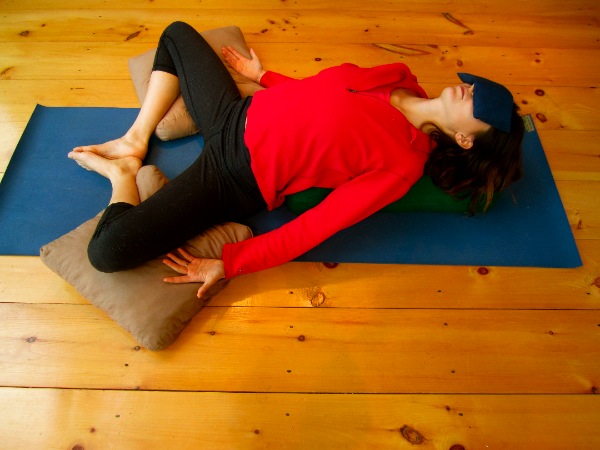
Benefits:
This pose is a good stress-reliever and can relax your body completely. It helps to relieve PMS and menopausal symptoms and has benefits for women preparing for childbirth. In addition, the pose calms the mind, improves digestion, and can help relieve mild depression. It gently opens the hips and chest and is an excellent pose to experience a healing heart meditation.
Props:
Bolster, Pillows, Strap, and Sandbag.
Technique:
1) Sit in Baddha Konasana. On an exhale recline your lower back and torso towards the bolster behind positioned behind your pelvis.
2) Position a pillow under each knee and relax your head down onto the bolster.
3) Allow your hips to externally rotate falling out to the sides as your groins sink in towards the pelvis.

4) Position your arms on the floor or pillows angled about 30 degrees away from the torso. Palms face upwards.
5) Stay in the pose for a few minutes increasing the hold to 10 minutes with continued practice. To come out use an arm to roll to the side, sliding off the bolster, rest for a few breaths before slowly coming up to a sitting position.
Variations:
A strap can be looped behind lower back, over insides of legs and around feet and loosened to a point where no leg muscles are activated, the body completely being supported by the strap and pillows. Therefore, no effort is needed to maintain the feet together. Additionally, Sandbags may be positioned on the inner thighs to ground the legs. However, it is important to make sure that the legs are fully supported before placing sandbags.
Breath:
Take a deep 3 count breath into the belly. Allow the breath to circle in the belly holding the breath for one count before slowly exhaling the breath for 6 counts.
Contraindications:
This pose should be avoided if you have a shoulder or hip injury. If you’ve had a knee or groin injury, use ample props to abstain from any stretch to the groin. Avoid this pose after child birth as the pelvic muscles and supportive structures may be overstretched.
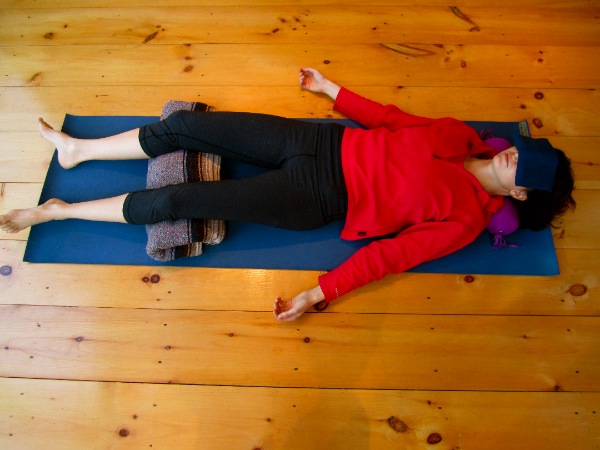
Benefits:
This pose helps calms the brain and reduces stress, headache, fatigue, and insomnia. It relaxes the body and helps lower blood pressure.
Props:
Bolster, (sandbag), (yoga block)
Technique:
1) From a sitting position turn to one side and gently lower into a side-lying position, then roll onto your back.
2) Take care to position the legs evenly angled away from the midline of the body and the arms out the side, palms face up. Make sure the shoulder blades are relaxed and spread the collar bones.
3) Allow the inner muscles of the legs, arms, and face to soften. Release any lingering tension in the body as you scan head to toe. Let the eyes be heavy and close the lids dropping inwards into the pose and releasing the external world.

4) Remain in this pose for 10 to 30 minutes while you integrate your mind, body, and spirit and allow your whole being to refresh and renew once more.
5) To release from the pose being by wiggling the fingers and toes, waking the body and then stretch the arms overhead and lengthen the spine with a few deep breaths. Bend your left leg and roll onto your right side. Stay here for a few breaths before pushing up to a comfortable sitting position.
Variations:
1)Use a block and sandbag to deepen the pose by adding weight to the top of the head. In Savasana, start by placing the block above the head at a 5 inch height. Next, lay the sandbag over the block and your forehead. Observe as your skull experiences a distractive force and allows the brain to sink away from the weight.
2) Position a bolster under the knees and pillows under the arms to support their weight.
3) Add a towel roll under the cervical spine to increase support and improve alignment to the neck.

Breath:
While holding the pose maintain a smooth, slow and gentle breath pattern that is soft, calm and easy.
Contraindications:
For those with back injury or discomfort, bend the legs placing a towel roll or bolster under the knees. During pregnancy it is avisable to raise the head and chest on a b
Benefits:
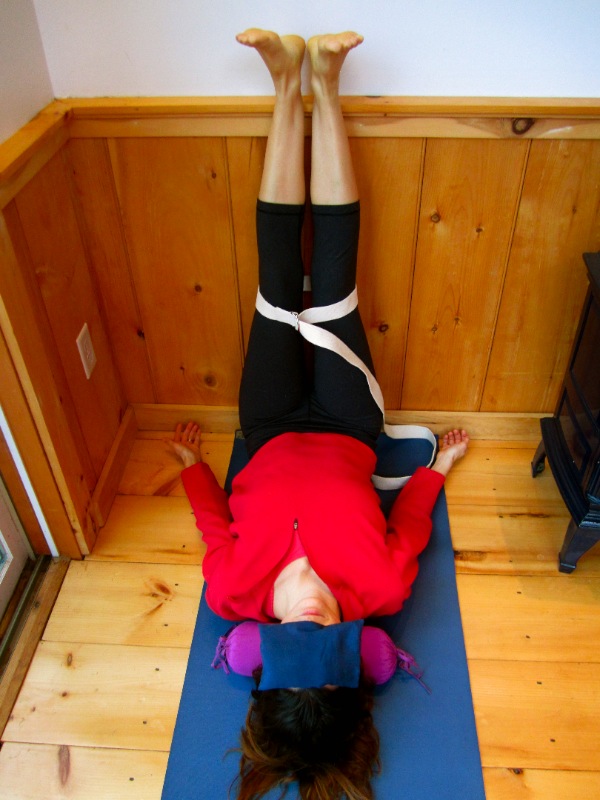
This pose helps to stimulate relaxation and digestion while reducing backache, sciatica, and menstrual discomfort. It offers a deep stretch to the hips, thighs, hamstrings, groins, and calves. Also, it has reported therapeutic benefit for high blood pressure, flat feet, and infertility.
Props:
Strap, Block, Folded Blanket
Technique:
1) Position your mat with the end flush to a wall. Lie supine on the mat with both heels against the wall. Rest your head onto the folded blanket.

2) Hug the left leg into the chest and press the right heel into the wall with the leg firm.
3) Secure a strap at the arch of the left foot and hold the strap with both hands while anchoring the shoulder blades to the mat slowly begin to extent the left leg. The arms should be fully extended, collarbones relaxed away from the sternum.
4) Breathe deeply and on each exhale, slowly draw the left foot closer to the head keeping the knee extended. You should feel the stretch deepening on the back of the leg. Continue to breathe deeply and hold this position for 1-3 minutes.
5) Lower the leg, releasing the strap and rest for 1 minute before repeating on the opposite side.
Variations:
1) Try bringing the raised leg out to the side placing the thigh on a block that’s been prepositioned. This support will help to soften the inner groin.
2) You can also swing the raised leg across the torso and rest it onto a pillow, bolster or block to support the leg and feel a stretch with the supported twist.

Breath:
Breath is deep and steady while maintaining a deep yin stretch.
Contraindications:
This pose should be avoided when experiencing diarrhea or headache. Caution should be used with high blood pressure by elevating the head and neck on a folded blanket.
Benefits:
This pose is a modification of Virasana. It provides a supported stretch to the abdomen, thighs, and deep hip flexors. It also improves digestion and helps to relieve menstrual pain.
Props:
Block, Bolster, Towel Roll
Technique:
1) Begin by sitting onto a block (positioned to the low or middle setting) with a bolster positioned behind the spine. Your knees and shinbones should be on the mat, shins parallel.
2) Exhaling, release backward lowering the lumbar spine onto the bolster, first lowering onto your hands, then your forearms/elbows and finally onto your lower back and buttocks.

3) Position a towel roll under the cervical spine to maintain neck alignment.
4) Make sure to keep the thighs parallel and the knees on the ground. If the knees pop up increase the height of the support.
5) Remain in the pose for 3-5 minutes.
6) To come out from the pose, press from your forearms to your hands and slide down off the bolster and block.
Variations:
1) Place a towel roll behind the knee joint to increase space of the joint in flexion (avoiding deep flexion of the knee).
2) Attempt Supta Ardha Virasa in which only one knee is bent into Virasana while the other leg is extended in front or bent with the foot flat on the floor. Recline onto the support. Repeat on the opposite side.
3) To further release the groins lay a sandbag across the top of the thighs. Gradually increase the weight.
4) Try bringing the arms overhead to the ceiling and then overhead with the palms facing upwards allowing the shoulders to externally rotate, the chest opening.
Breath:
Breathe gently into the abdomen as the groins and thighs release. Imagine the muscles lengthening on each exhale. Soften any muscles that are tensed as you send nourishing breath into these areas.
Contraindications:
Avoid this pose If you have any serious back, knee, or ankle problems without guidance from an experienced yoga instructor.
Benefits:
May help relieve lower and upper back pain including slipped discs. May assist in digestion.
Props:
Towel Roll or Two Pillows
Technique:
1) Lie on your stomach with your forehead resting onto the towel roll or pillows positioned in a V shape so that there is room to breath without crunching or over-stretching the neck.
2) Stretch both arms overhead palms up or along the body palms down.
3) Maintain this pose for 3-5 minutes. To come out from the pose, bend the arms and press the hands into the floor hinging back into child’s pose.

Variations:
1) Draw one leg up to the side flexing the hip and knee. Hold for 1-2 minutes then switch.

Breath:
Breathe deeply feeling your abdomen pressing into the ground on the inhalation allowing the muscles of the low back, legs and face to relax fully.
Contraindications:
Use caution with certain back pain stemming from stenosis as it may accentuate nerve compression.
Benefits:
May offer relief from upper and lower back pain including herniated discs.
Props:
Yoga Mat, Small Towel Roll
Technique:
1) Lie prone with the forehead resting onto the floor or tightly rolled towel roll depending on comfort.
2) Interlock hands or place left over right on the back of the head, palms down.
3) Relax your elbows onto the floor.
4) Hold the posture for 2-3 minutes observing the sensations and the mental machinations, releasing tension and letting go of held muscles.
Breath:
Breath is deep and slow, calm and steady.
Benefits:
May offer relief from upper and lower back pain including herniated discs. May help to reduce tension and anxiety. Also known as a helpful pose for treating asthma as it allows chest/lung expansion.
Props:
Yoga Mat

Technique:
1) Relax on your belly with your arms folded on the mat above your head.
2) Rest your chin onto your palms and elbows onto the mat.
3) Release any tension held in the legs or spine.
4) Observe sensations of the lower back and neck. Adjust the position of the elbows to minimize tension.
5) Hold this pose for several minutes before transitioning to the next pose.
Breath:
Breath is deep and slow, calm and steady.
Benefits:
This pose helps to calm the brain and ease sciatica and menstrual pain. Ease of childbirth has been reported with consistent practice throughout pregnancy.
Props:
Pillow

Technique:
1) Start in Dandasana with your back straight and your legs extended.
2) Bend your left knee and position your left foot on top of your right thigh with the left knee remaining on the floor.
3) Allow the lower leg to remain extended or bend it under the upper leg so that the right foot is under the left knee.
4) If either knee is lifted from the ground, place the pillow under it to support the knee. Relax the leg muscles and hold the spine erect.
5) Hold the pose for 1-2 minutes, building time gradually.
6) Switch out the legs breathing deeply during the transition and repeat on the opposite side.

Breath:
Send deep breaths into any tight areas of the hips, legs, or spine and allow the mind to let go of any force or effort.
Contraindications:
Avoid this pose if you have lax ligaments in the knees or ankles to prevent over-stretching and injury.
Benefits:
There are many benefits to this pose including improved digestion and elimination through the increased blood flow to the abdomen. Regular practice enhances the strength of the hips, pelvis and thighs. Overall, this pose creates a tranquil calm feeling that aides in stress reduction and promotes mindful clarity.
Props:
Small Bolster or Pillow

Technique:
1) Come into a kneeling position on your mat. You may wish to kneel onto a pillow or folded blanket.
2) Allow your heels to drop out and sit down onto the inner arches of your feet. Keep in mind if there is strain to the knees place a bolster or pillow under your pelvis and sit bones. This will alleviate the deep knee flexion and the related discomfort for some bodies.
3) Once sitting, take a moment to align the spine lengthening from the tailbone out through the crown of the head. The pelvis tilts forward as the spine lengthens encouraging a restorative alignment.
4) Allow the shoulders to drop away from the ears and feel the sits bones/pelvis grounding into the support beneath.
4) Rest your hands, palms facing down, softly onto the thighs
5) Maintain this alignment for 5 minutes continuing to lengthen the spine on the inhalations and spread the collar bones on the exhalations.
Breath:
On the inhalation ground the sits bones down towards the earth. On the exhalation imagine the crown of the head lifting up towards the sky.
Caution:
Use with guidance from an experienced yoga teacher if knee problems are present.
Benefits:
This pose helps to stretch the hamstrings, groins, and calves. It may help reduce back pain and sciatica. Some reports claim benefits in reducing high blood pressure and improving fertility with practice of this pose.
Props:
Towel Roll, Wall, Block, Strap
Technique:
1) Place your mat perpendicular to the wall. Sit down onto the mat with the legs extended, heels pressing into the wall. Place the block under the left heel (The block isn’t necessary if your hamstrings are very flexible).
2) Carefully transition into supine, coming down onto the elbows and rolling down onto your back. Heels remain against the wall.
4) Bend the right knee and loop a strap around the arch of the right foot. Hold the strap with both hands. Extend the left knee and push the left heel into the wall. Inhale and straighten the right knee extending the right heel up to the ceiling.
5) Walk your hands up the strap until both elbows are fully extended. Press the shoulder blades towards the ground and widen the collarbones. The arms should be engaged from the shoulders drawing down towards the mat with no bend/pull at the elbows.
6) Extend the right knee strongly and dip the toes toward the shinbone for an added stretch. Hold the leg as close to vertical as possible drawing the leg towards the head with each successive exhale.
7) Hold this pose for 1 minute before slowly releasing the leg and returning to a sitting position. Follow steps 1-6 for the opposite side.
Variations:
This pose can be done without the strap and using the wall as a support. The main concept is the same as the above with the main difference being the body position at an angle of 45 degrees to the wall. Begin in supine; heels against the wall and the body angled 45 degrees from the wall. Press the left heel into the wall and bend the right knee (the leg closest to the wall) into the chest. Extend the right leg and place it onto the wall. Allow the leg to fall towards the floor intensifying a groin stretch. For a greater stretch angle your body so that it is closer to the wall. Moving the body away from the wall will lessen the stretch. Position yourself finding your personal edge of comfort and remain in this position for 3-5 minutes. Remember to do the opposite side for the same amount of time.
Breath:
Concentrate on lengthening the time of exhalation for 2x the time of inhalation. Focus your attention on the gentle pause between the inhalation and exhalation. Allow all muscles that aren’t being used including muscles of the face and belly to fully relax. Use gentle effort, without force. Relax, Renew, Restore!
Contraindications:
Diarrhea, headache. If you have high blood pressure place a towel roll under the head and neck.
Benefits:
Also known as abdominal breathing, diaphragmatic breathing is an excellent way to increase relaxation in a supported position. It allows the parasympathetic nervous system to kick in which promotes rest and digestion as well as an overall sense of well being.
How it works:
The diaphragm is a large dome-shaped muscle that divides the chest and abdomen. As it contracts it descends causing the abdominal cavity to expand. Meanwhile, the negative pressure created in the chest draws air into the lungs, venous blood flow into the heart, and lymph to circulate through the chest cavity. Together, these processes improve oxygenation, increase nutrient supply to the tissues and remove unhealthy bacteria and waste matter. This leads to healthier tissues and reduction of disease.
Technique:
1) Position yourself in a reclined position, possibly Salamba Baddha Konasana.
2) Place your right hand onto your chest and the left on the abdomen.
3) Inhale through the nose and observe the right hand rising higher than the left hand as the chest/lungs fills with air.
4) Exhale through the mouth and then draw a slow deep breath in through the nose allowing the lung bases to fill fully with air and then hold the breath for a count of 7.
5) Release the breath slowly through the mouth for a count of 8 making sure that the lungs expire fully. Use a gentle contraction of the abdomen to empty the lungs fully.
6) Repeat the breath cycle 4 more times at a rate of one breath for every 10 -12 seconds.
Of note:
The expiration should be twice as long as the inspiration. Use the hands as a tool to observe the breath, though once you are comfortable with the abdominal breathing you can relax them to the side.
Suggestion:
Use a mantra to coincide with the inhalation/exhalation such as “I am breathing in love and peacefulness, I am breathing out worry and fear”.
Restorative yoga is a therapeutic style of yoga that promotes deep relaxation for the body through supportive poses. The more the body is supported the deeper the relaxation can be experienced. In full relaxation, there is no movement, no effort and the mind is silent.
Restorative yoga helps to engage the parasympathetic nervous system allowing for improved digestion and the reduction of muscle tension, chronic stress, fatigue, blood pressure, serum triglycerides, and blood sugar levels. While the body relaxes in restorative yoga poses, health is promoted throughout all of the organs, tissues, and body systems.
Restorative yoga facilitates this deep relaxation through the use of props including blankets, straps, pillows, eye bags, wedges, and blocks which enable well-supported postures. When fully supported with the props, the body is able to enter into a state of deep and total relaxation. Typically restorative poses are held for 5-10 minutes or as long as they are comfortable.
Sequences of restorative yoga poses are designed to optimize relaxation by promoting healthy spinal motion. A well-rounded series will include backbends, forward bends, and twists in both directions. At the conclusion a restorative yoga practice is often an inverted pose, which aides in the reduction of blood pressure, heart rate and fluid retention.
Another benefit of restorative yoga is experienced by the organs. As poses alternate from forward bend to backbend and rotation right and then left, organs are rinsed free of waste and rejuvenated with healthy blood flow.
Through regular practice of restorative yoga comes the blissful juicy moments of a balanced mind, body and spirit.

Why is Restorative Yoga perfect for me?
If you are like most of us living in modern day society, life moves fast often with deadlines and demands brought on by family, job, and the constant rat race to keep up with it all. This leads to a chronically stressed state of being that jeopardizes the health of an otherwise naturally creative, resourceful, and whole person.
The body has a profound ability to heal itself and return to balance and homeostasis if allowed. However, it is rare that we take time out of our busy lives to listen to our bodies and slow down. The result is a compromised immune system, injury, and/or illness. Most of us know this but we don’t do anything to change until it is “too late”.
The further from balance we allow ourselves to drift, the more illness including low back pain, ulcers, high blood pressure (hypertension), and depression may result. Fortunately, in most cases we can break the cycle and restore our health.

To break the chronic stress cycle and find a way back to balance start with small steps. Giving yourself even 5 minutes a day of time of pure relaxation can be the baby steps needed to make a lasting change. Start by lying down on your mat (or blanket), place a bolster (or pillow) under your knees and a towel roll under your neck.
If you have one, place an eye pillow over your eyes and begin to breathe deeply into your belly releasing the tension from your face, eyes, chest and down through your abdomen. Allow your arms and legs to be free of tension and rest softly onto the ground.
On this website you will find poses and meditations on that can be practiced daily to help restore your body, mind and spirit back into balance, reducing stress and thereby improving your immune system and quality of life. Restorative yoga soothes your nervous system, quiets your mind and enables you to release deeply held tension. Think of it as a giant exhale that wraps your body warmly and gently reconnects you with yourself.